
Issuer User Manual | Tokenisation Issuer Dashboard Guide
Issuer User Manual | Tokenisation Issuer Dashboard Guide

Once an individual or institution is approved by the Super Admin to become an Issuer, they will see a toggle button on their interface. When the Issuer clicks on the toggle button, they will be directed to the Issuer persona dashboard.
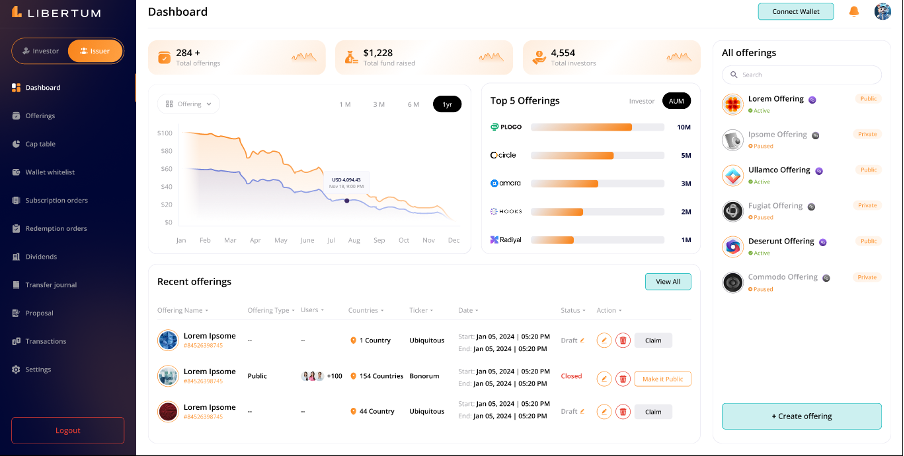
The Issuer dashboard will display the following details:
● Total Offerings: The total number of offerings that have been created and successfully approved & deployed by the Super Admin.
● Total Funds Raised: The cumulative amount of funds raised across all offerings created by the Issuer.
● Total Investors: The total number of investors who have invested in the Issuer’s offerings.
AUM Comparison (Line Chart): The dashboard features a line chart allowing Issuers to compare different offerings based on Assets Under Management (AUM). Issuers can select up to 5 offerings at once for comparison.
FR:001 The issuer must click on the “Chart” to allow Issuers to compare different offerings based on Assets Under Management (AUM). The chart will show how AUM has increased/decreased each month. When hovering over the line, the Issuer can view the specific AUM for each offering.
FR:002 The issuer must click on the “1D”, “1M”, “7D”, “1Y” to view the chart for different time periods.
FR:003 The Super admin must click on the “Top 5 Holdings” adjacent to the chart to view the top 5 offerings based on AUM or the number of investors.
The “Recent Offering” on the “Dashboard” lets the Issuer view the latest 3 offerings they have created, displayed prominently on the dashboard. The table displays the following information about the offerings -
● Offering Name
● Offering Type
● Token Address
● Fund Address
● Countries
● Ticker
● Start Date
● Status
● Action
\ ○ Deploy Wrapper
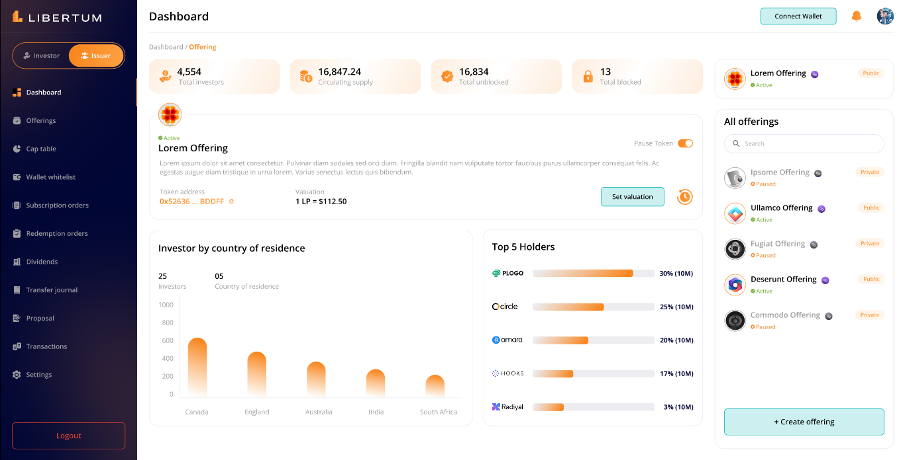
FR:004 The Issuer must click on the “Ticker Name” in the “Offering Name” column of the “Recent Offering” table to be redirected to another page, where the Offering Details like -
● Total Investors - The number of investors in that specific offering.
● Circulating Supply - The total circulating supply of tokens for that offering.
● Total Unblocked - The total number of unblocked tokens.
● Total Blocked - The total number of blocked tokens.
● Description -
● Token address
● Valuation
● Set valuation
● Clock Symbol redirecting to NAV History Tab
● Investor by Country of Residence Chart - The chart showcases the distribution of investors by their country of residence.
● Top 5 Holders Bar Chart - A bar chart showing the top 5 holders of the Issuer’s tokens on the dashboard.
The following screen will pop-up once the Issuer clicks on the “Ticker Name”
FR:005 The Issuer must click on the “Token Address” mentioned against each Offering to view the Token address on the Scan.
FR:006 The issuer must click on the “Fund Address” mentioned against each Offering to view the Fund contract details on the Scan.
FR:007 The issuer must click on the “Deploy Wrapper” to
FR:008 The issuer must click on the “View All” on the top right of the Recent Offerings to view all the offerings created on the platform. This will redirect the Issuer to the Offerings tab.
Create Offering
FR:009 The Issuer must click on the “+Create Offering” at the bottom of the “All Offering” section to create a new offering on the platform. The Create Offering is divided into 4 categories namely-
● Overview
● Offering & Project Details
● Documents
● Team
● Preview
The “Overview” section page contains the following information and the issuer must enter all the below details before they move to the next steps -
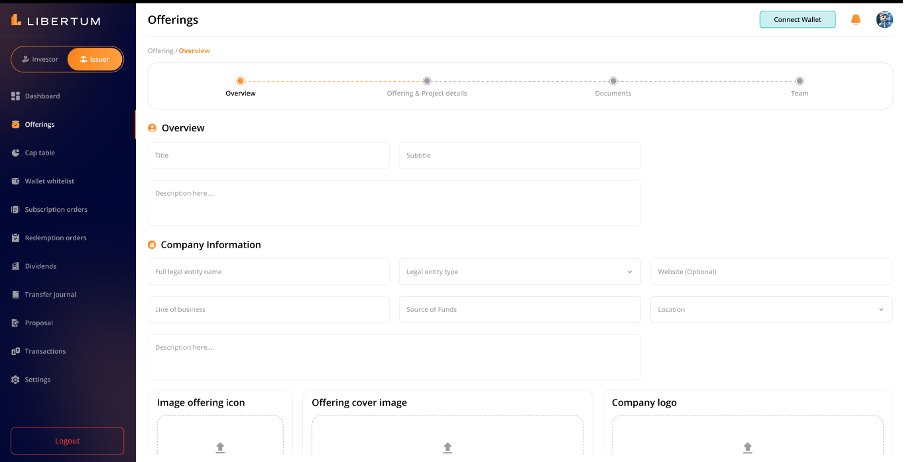
● Overview
\ ○ Title
\ ○ Sub-title
\ ○ Description
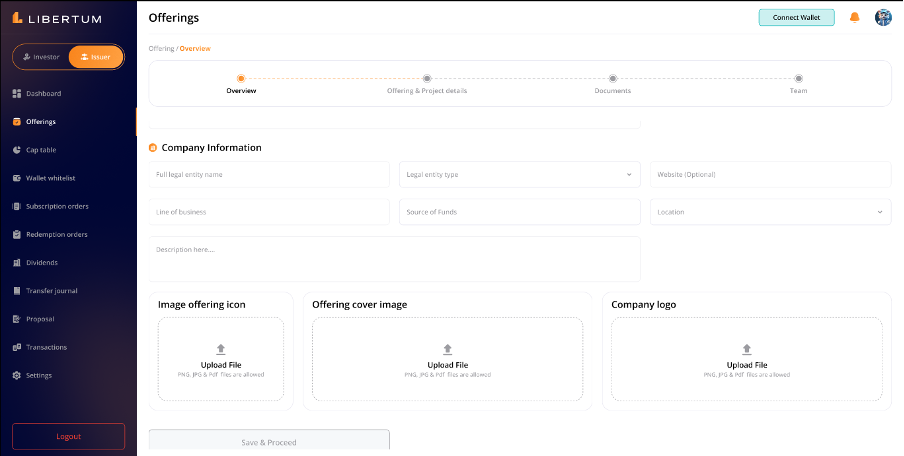
● Company Information
\ ○ Full legal Entity Name
\ ○ Legal Entity Type - A dropdown menu allowing the user to select the type of legal entity (e.g., LLC, Corporation, Partnership).
\ ○ Website (Optional)
\ ○ Line of Business
\ ○ Source of Funds
\ ○ Location
\ ○ Description
● Token Icon
\ ○ Upload File
● Offering Cover Image
\ ○ Upload File
● Company Logo
\ ○ Upload File
FR:010 The Issuer must click on the “Save & Proceed” to Save and proceed to the next step.
The “Offering & Project Details” section page contains the following information and the issuer must enter all the below details before they move to the next steps -
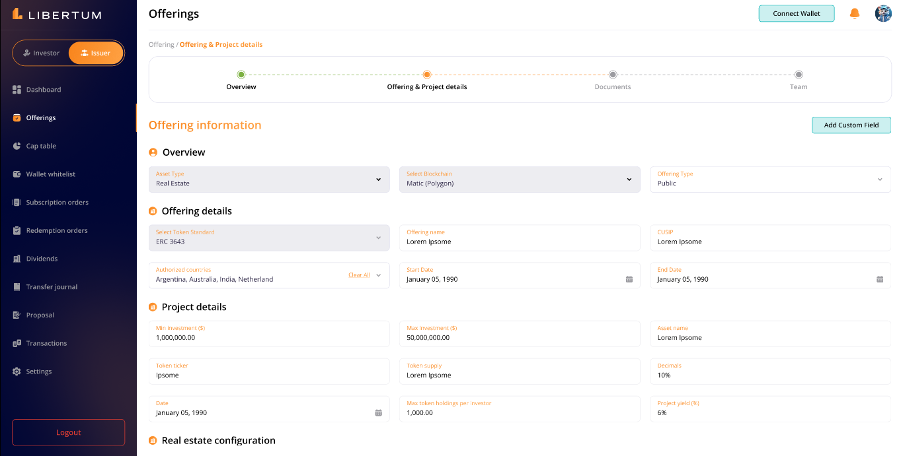
● Overview
\ ○ Asset Type - A dropdown menu allowing the user to choose the type of asset
\ ■ Real Estate
\ ■ Equity
\ ■ Others
\ ○ Blockchain - A dropdown menu to select the blockchain network
\ ■ Ethereum
\ ○ Offering Type - A dropdown menu to choose the type of offering
\ ■ Public Offering
\ ■ Private Offering
\ ■ Share Capital Management
● Offering Details
\ ○ Select Token Standard - A dropdown to select the token standard
\ ■ ERC- 3643
\ ○ Offering Name - A text field to enter the name of the offering.
\ ○ CUSIP/ISIN - A text field to input the CUSIP number if applicable
\ ○ Authorized Countries (Drop Down Menu) - A dropdown or multi-select option to specify which countries are authorized for the offering.
\ ○ Start Date (Date Picker) - A date picker to select the start date of the offering with time.
\ ○ End Date (Date Picker) - A date picker to select the end date of the offering with time.
● Project Details
\ ○ Asset Name - A text field to input the name of the asset
\ ○ Token Ticker - An alphanumeric field to input the token ticker symbol.
\ ○ Token Supply - A numeric field to specify the total supply of tokens.
\ ○ Decimals - A number field to indicate the number of decimal places for the token.
\ ○ Lock-up Period (Months) - A date picker or numeric field to set the hold time or lock-up period.
\ ○ Calculated Lock-up Date
\ ○ Max Token Holding Per Investor - A numeric field to specify the maximum number of tokens an individual investor can hold.
● Real Estate Configuration
\ ○ Min Investment ($) - A numeric field to specify the minimum investment amount.
\ ○ Max Investment ($) - A numeric field to specify the maximum investment amount.
\ ○ Projected Yield (%)
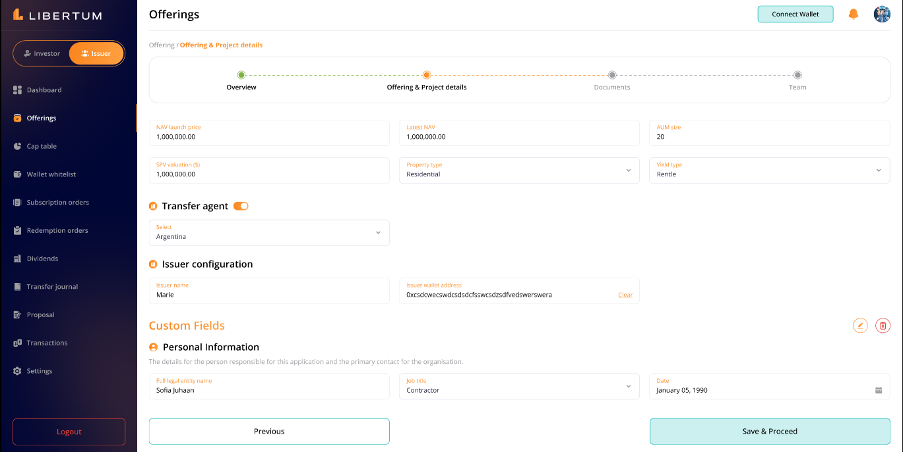
\ ○ NAV Launch Price - A numeric field for entering the Net Asset Value at launch.
\ ○ Latest NAV - A numeric field to input the most recent Net Asset Value.
\ ○ Property Type - A dropdown menu to select the type of property involved in the offering. It includes commercial property, Residential, Agricultural Land, and Non-Residentials.
\ ○ Property Sub- type (Optional)
\ ○ Year Built
\ ○ Lot Size (Sq. M.)
\ ○ Occupancy (%)
● Transfer Agent - The issuer has the option to enable or disable the “Transfer agent” feature using a toggle switch.If enabled, the user must select a transfer agent from a dropdown menu.
● Issuer Configuration
\ ○ Issuer Name - A text field for entering the name of the issuer.
\ ○ Issuer Wallet Address - A text field for entering the blockchain wallet address associated with the issuer.
● Custom Field -
\ ○ Configuration Fields
FR:011 The Issuer must click on the “Add Custom Field” to add any specific custom field to the offering that they intend to create. The issuer must be able to add custom fields by clicking the “Add Custom Field” button. Custom fields should allow the user to define a label, input type (text, number, date), and whether the field is required.
All mandatory fields (e.g., Offering Name, Asset Type, Blockchain, Start Date) must be filled out before allowing the user to proceed.
The form should validate that numeric fields contain valid numbers and that dates are in the correct format. The user should have the option to save their progress and continue later, with a “Save” or “Save & Continue” button.
FR:012 The Issuer must click on the “Previous” button to go back to the previous page
FR:013 The Issuer must click on the “Save & Proceed” to Save and proceed to the next step.
The “Documents” section page requires the issuer to upload all the asked documents related to their offering before they move to the next steps -
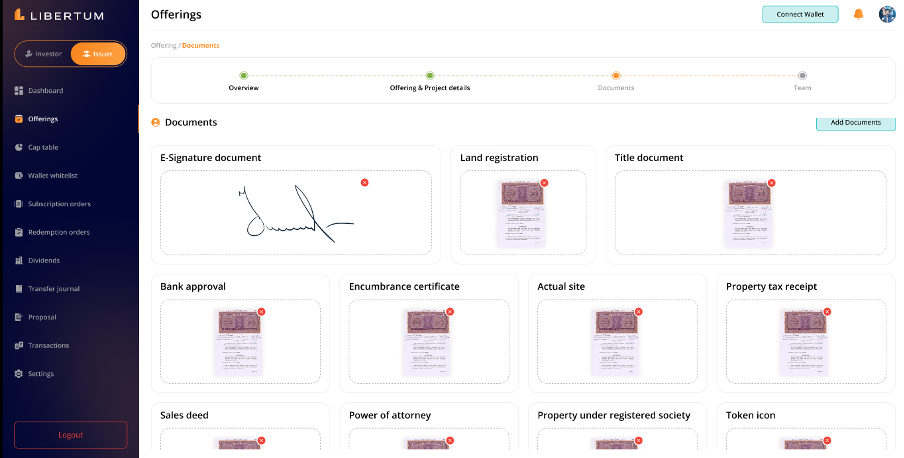
● E-Signature Document
● Pitch Deck
● Confidential Information Memorandum
● Land Registration
● Title Document
● Bank Approval
● Encumbrance Certificate
● Property Tax Receipt
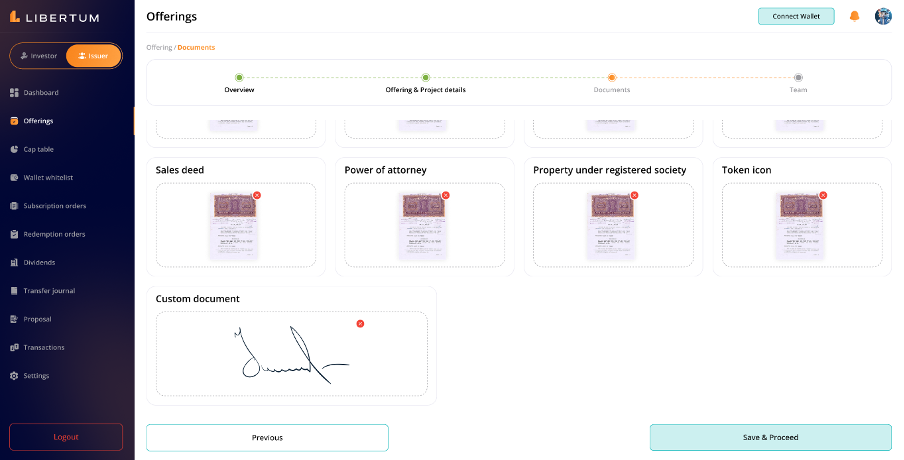
After uploading, each document should be displayed as a thumbnail within its respective category box.
Each uploaded document should display an “X” icon, indicating the option to remove or delete the document.
Only valid file types (e.g., PDF, JPEG, PNG) should be accepted for upload.
The system should validate the document size to ensure it doesn’t exceed the maximum allowed limit.
Each document category should show a status indicator (e.g., green checkmark) once the document is successfully uploaded and meets all requirements.
If a required document is missing or incorrect, the category should indicate that action is needed (e.g., with a red cross or warning symbol)
FR:014 The Issuer must click on the “Previous” button to go back to the previous page
FR:015 The Issuer must click on the “Save & Proceed” to Save and proceed to the next step.
The “Team” section page requires the issuer to add Team member to the offering -
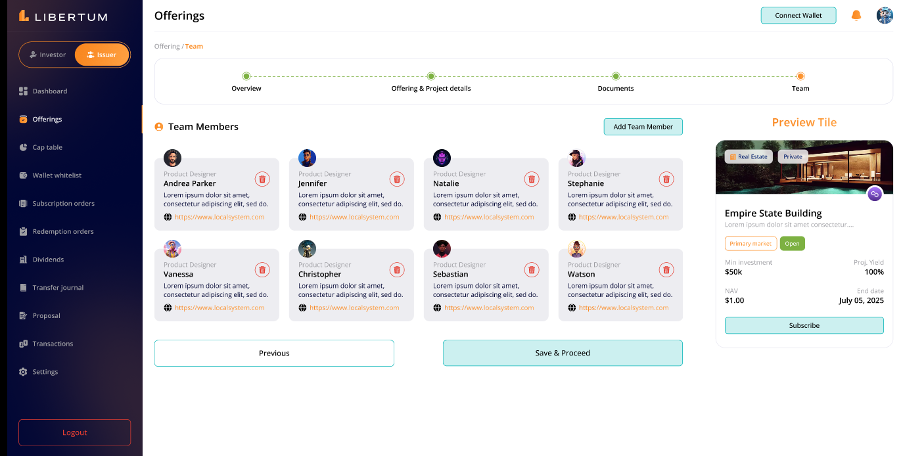
FR:016 The issuer must click on “Add Team Member” to add a team member for a particular offering. The issuer must enter -
● Legal Full Name
● Title
Post entering the above mentioned information the issuer must click on “Confirm” to proceed further.
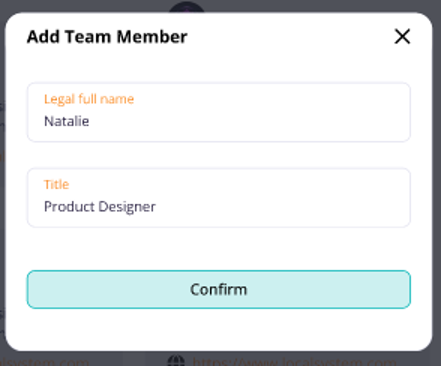
On clicking on “Add Team Member” a pop-up window appears where they must fill in following information about the team member-
● Legal Full Name
● Title
● LinkedI Profile (Optional)
● Twitter URL (Optional)
● Bio Information (Optional)
● Upload Image (Optional)
● Confirm
The user should have the ability to add a new team member by clicking the “Add Team Member” button. Upon clicking, a form should open where the user can input details such as the team member’s name, role, bio, profile picture, and a link to their LinkedIn profile or professional website.
Editing Team Member: The user should be able to edit the details of any team member by clicking on an “Edit” icon on the team member’s card. Upon clicking, the existing information should populate an editable form, allowing the user to update the team member’s details.
Deleting Team Members: The user should have the option to delete a team member by clicking on the team member’s card.
Team Member Limit: The system should allow a maximum number of team members to be displayed (e.g., up to 6 team members).
If the limit is reached, the “Add Team Member” button should be disabled or removed, with a tooltip or message indicating the limit
Team Member Order: The user should be able to drag and drop team member cards to reorder them as they wish. The order should reflect the hierarchy of the team members.
The order of the team members should be saved and displayed consistently across sessions.
Preview Tile: A preview section on the right side should display a tile summarizing the offering details, including the name, image, investment information, and key dates.
The preview update in real-time to reflect any changes made to the offering details.
Navigation Controls: The user should be able to navigate back to the previous section using the “Previous” button or proceed to the next step in the offering process using the “Save & Proceed” button. The “Save & Proceed” button should save all changes made to the team members before moving to the next step.
FR:017 The Issuer must click on the “Previous” button to go back to the previous page
FR:018 The Issuer must click on the “Save & Proceed” to Save and proceed to the next step.
In case the issuer feels there are certain changes required then they must click on the “Previous” button to go back and make changes if any.
When the Issuer will click on the “Confirm “ button the complete offerings details will appear in a pop-up modal format for the issuer to review, once satisfied with the information they can click on the “Confirm” button to proceed. And will be redirected to the Offering Page.
The “Preview and Publish” section page requires the issuer to preview the offering created on the platform and publish-
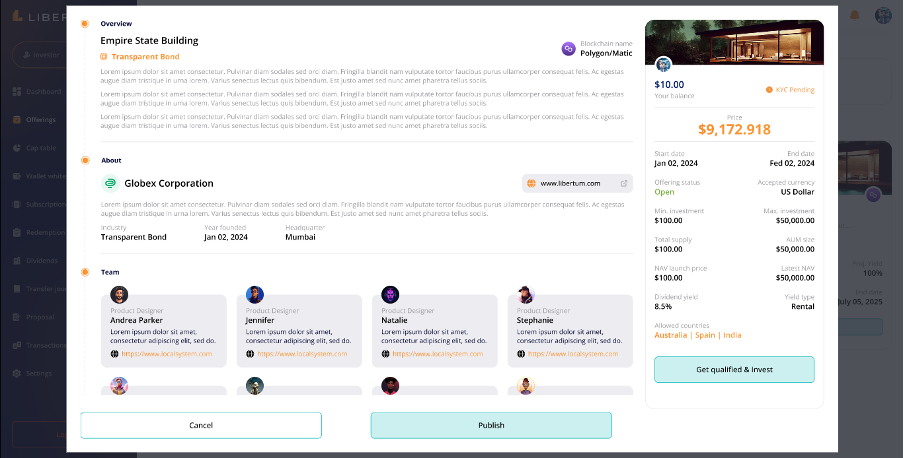

The Preview and Publish section is divided into following sub-sections-
● Overview
● About
● Team
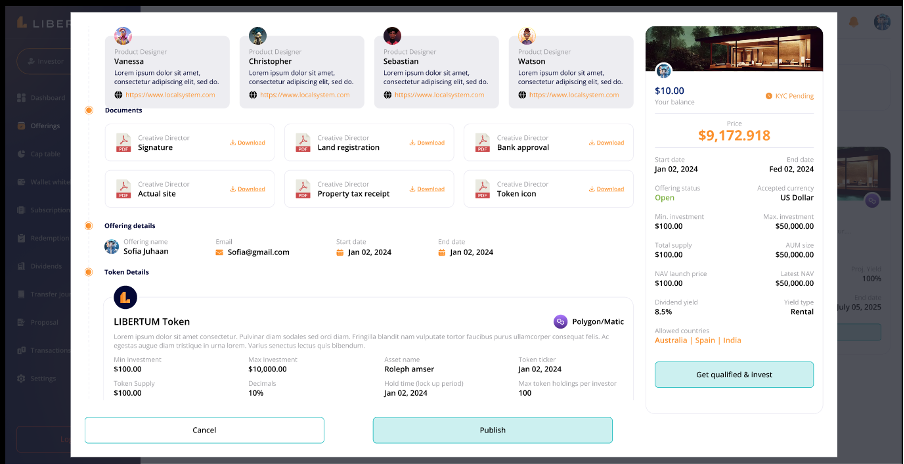
● Documents
● Offering Details
● Token Detail
\ ○ Real-estate Configuration
\ ○ Issuer Configuration
\ ○ Overview
\ ○ KYC
Overview - The issuer will view a detailed overview of the offering, including the project name, Asset type (e.g., Real estate), description, and blockchain name (e.g., Base).
The overview section will display information about the offering, including the Offering name, description, and blockchain name.
About - The “About” section displays the company or organization responsible for the offering (e.g., Globex Corporation). The section should include key details such as Industry, Year Founded, Headquarters location, and a brief company description.
A clickable link to the company’s website should be provided.
Team - The issuer will be able to see a list of all team members associated with the offering, displayed in card format. Each team member’s card should include their name, role (e.g., Product Designer), a short bio, and a link to their LinkedIn profile or professional website. The team section should allow for a clear display of multiple team members, each with their designated card.
Documents - It will showcase all the documents uploaded by the issuer (e.g., Actual Site, Property Tax Receipt, Token Icon), which investors can download.
Offering Details - The issuer should be able to see key offering details, including Offering Name, Email, Start Date, and End Date.
Token Details - The user should be able to review detailed token information, including:
● Token Name (e.g., ABC Token)
● Minimum Investment
● Maximum Investment
● Token Supply
● Decimals
● Asset Name
● Token Ticker
● Hold Time (Lockup Period)
● Maximum Token Holdings per Investor
● The blockchain name (e.g., Base) should be clearly displayed, along with the token ticker.
Real Estate Configuration Section - The issuer should be able to review the real estate configuration related to the offering, including:
● NAV Launch Price
● Latest NAV
● AUM Size
● SPV Valuation
● Property Type - Commercial, Residential, Agriculture land, Non-Residential
● Yield Type - Rental or Non-Rental
Issuer Configuration Section: It will include the issuer’s name and wallet address. The wallet address added here will have full access to functions like minting, burning, freezing, unfreezing, and force transferring.
Overview: On the right hand side, key details will be displayed, including
● Price
● Start Date
● End Date
● Offering Status
● Accepted Currency
● Minimum
● Maximum Investment
● Total Supply
● AUM Size
● NAV Launch Price
● Latest NAV
● Dividend Yield
● Yield Type.
● Allowed Countries
KYC Status: The overview should clearly indicate the KYC status of the user (e.g., “KYC Pending or KYC Approved).
If the KYC process is incomplete, the system should prompt the user to complete it before they can subscribe. Without KYC, investors would not be able to subscribe to the offering.
Preview and Edit: The issuer should be able to preview the entire offering details before publishing. If any details are incorrect or need changes, the user can either navigate back using the “Previous” button or directly edit specific sections as needed.
FR:019 The issuer must click on the “Publish” button available at the bottom of the page, allowing the user to publish the offering after reviewing and confirming all details. Upon clicking “Publish,” the system will validate that all required fields are correctly filled out and that there are no outstanding fields(e.g., missing documents or incomplete fields).
If the offering is successfully published, a confirmation message will appear: “Your offering has been published and is under review by the Super Admin.” Once approved or deployed by the Super Admin, the offering will be available in the Primary Market section.
FR:020 The issuer must click on the “Cancel” button, allowing the user to exit the publishing process without making any changes. Upon clicking “Cancel,” a confirmation dialog should appear to prevent accidental cancellation, asking, “Are you sure you want to cancel this offering?”
Note:
After the offering is published, a request will be sent to the Super Admin for approval and token deployment on-chain.
Offering Section
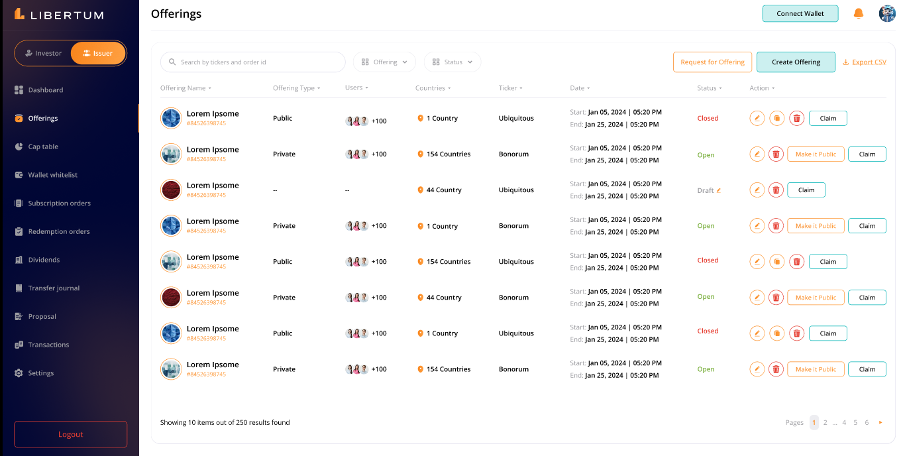
The “Offering” section under the Issuer tab displays all the information about the offerings that the issuer has created on the platform till date. The table displayed following information-
● Offering Name
● Offering Type
\ ○ Public
\ ○ Private
● Users
● Token Address
● Fund Address
● Countries
● Ticker
● Start and End Date
● Status
\ ○ Closed
\ ○ Open
\ ○ Draft
● Action
\ ○ Edit Draft
\ ○ Copy
\ ○ Deploy Wrapper
\ ○ Delete
\ ○ Make it Public
\ ○ Claim
FR:021 The issuer must click on the “Search Bar” to search a particular offering from the list by entering the ticker or offering name.
FR:022 The issuer must click on the “Offering” search option next to search bar to filter the offerings on the following basis-
● All
● Public
● Private
FR:023 The issuer must click on the “Status” search option next to Offering search option to filter the offerings on the following basis-
● All
● Open
● Closed
FR:024 The issuer must click on the “Request for Offering” button to click on the top right side of the screen to request a new offering. This request will be sent to the Admin, who will then assign a sub-admin to create the offering.
FR:025 The issuer must click on the “Create Offering”button available on the top right side of the screen to create an offering. This will direct the user to the create offering modal and the issuer must follow steps to complete creation of the offering as mentioned in the FR:000.
FR:026 The issuer must click on the “Export CSV” to export the exhaustive list of offerings on the CSV format to view offline.
FR:027 The issuer must click on the “Ticker” mentioned below the Offering name in the “Offering Name” column to be redirected to the Offering detail page and view all the information related to the offering.
FR:028 The issuer must click on the “Draft (Edit symbol)” button under the Action column to edit the particular offering.
FR:029 The issuer must click on the “Copy” button to copy the offering. Once an issuer does this the new copy offering will come with an edit button, enabling the user to edit any information.
FR:030 The issuer must click on the “Delete” button to delete a particular offering.
FR:031 The issuer must click on the “Make it Public” button to make a particular public on the Libertum platform.
FR:032 The issuer must click on the “Claim” button to allow the Issuer to transfer tokens to their wallet or any other user’s wallet.
FR:033 The “Pagination”displaysFR:000 The “Pagination” displays the number of offerings exceeding the number visible on a single page (e.g., showing 10 offerings per page with navigation for additional pages).
Cap Table
The “Cap Table” section showcases the holdings of an investor in ascending/ descending order. The table changes as the holding changes with the investors.
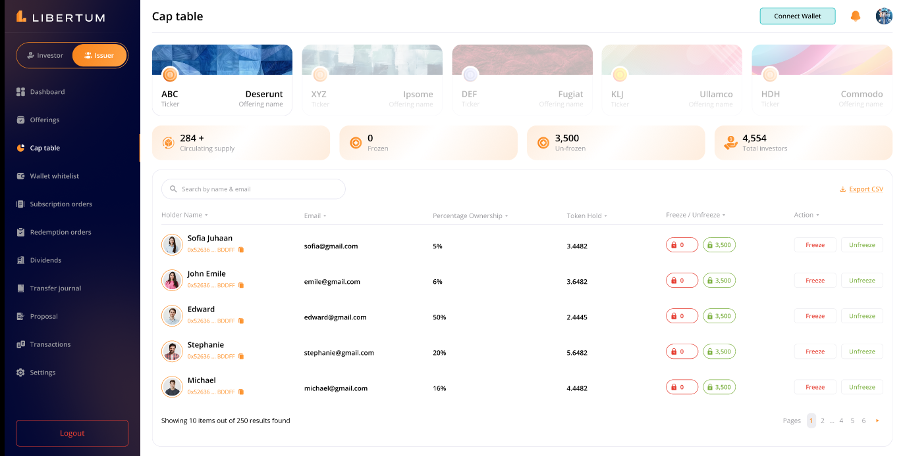
The Cap table page displays the following information -
● Runner displaying various offerings on the top in card format displaying Ticker and Offering Name
● Circulating Supply
● Frozen
● Unfrozen
● Total Investors
● Cap Table
\ ○ Holder Name
\ ○ % Ownership
\ ○ Token Hold
\ ○ Freeze/ Unfreeze
\ ○ Action
■ Freeze
■ Unfreeze
FR:034 The issuer must click on the “Search Bar” to search the holder’s information by entering name or email address.
FR:035 The issuer must click on the “Export CSV” to export the CSV file of the holders holding various offerings.
FR:036 The issuer must click on the “Copy” button under the Wallet Address column to copy the wallet address of the particular holder.
FR:037 The issuer must click on the “Freeze” or “Unfreeze” button under the Action column to freeze or unfreeze a particular holder based on the Issuer’s discretion.
FR:038 The “Pagination”displaysFR:000 The “Pagination” displays the number of holders exceeding the number visible on a single page (e.g., showing 10 offerings per page with navigation for additional pages).
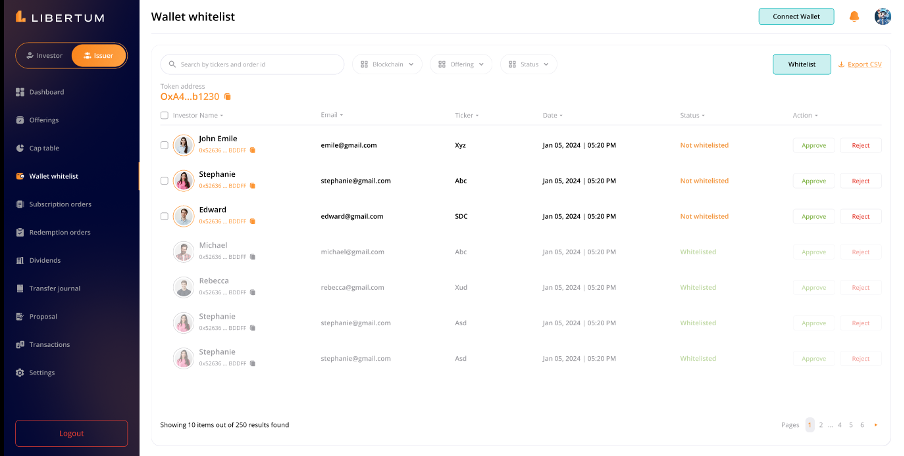
Wallet Whitelist
The “Wallet Whitelist” tab on the Issuer section displays the requests that the Issuer receives for whitelisting the wallets.
● Investors who subscribe to offerings in the Primary Market will have their requests sent to the wallet whitelist section.
● The issuer will see a list of pending/not whitelisted requests at the top of the whitelist section.
● The issuer can view these requests one offering at a time.
FR:039 The issuer must click on the “Search Bar” to search for a particular offering by entering the ticker or order Id.
FR:040 The issuer must click on the “Blockchain” to search the requests received for wallet whitelisting of the users using blockchain filter.
FR:041 The issuer must click on the “Offering” to search the requests received for wallet whitelisting of the users using the offering filter.
FR:042 The issuer must click on the “Status” to search the requests received for wallet whitelisting of the users using the Status filter.
FR:043 The issuer must click on the “Export CSV” to export the CSV file of all data entries.
FR:044 The issuer must click on the “check box” to select a particular or multiple Investor simultaneously.
FR:045 The issuer must click on the “Approve” button available on the extreme right of a particular row to whitelist the wallet. This button will be enabled only if one or more investors are selected. If no investors are selected, the button will be disabled.
● Once investors are selected, the issuer will click the “Approve” button, triggering a Web3 pop-up.
● A Web3 pop-up will appear, prompting the issuer to whitelist the selected wallets.
● The issuer must connect using their designated wallet:
● If the issuer attempts to connect with a different wallet, an error message will appear: “Wallet Address not found.”
● Upon successful connection and whitelisting, the status of the selected investors will change from “Not Whitelisted” to “Whitelisted.”
Subscription Orders
The issuer under the “Subscription Orders” page is able to to mint tokens after payment confirmation, so that they can distribute them to investors who have successfully made investments.
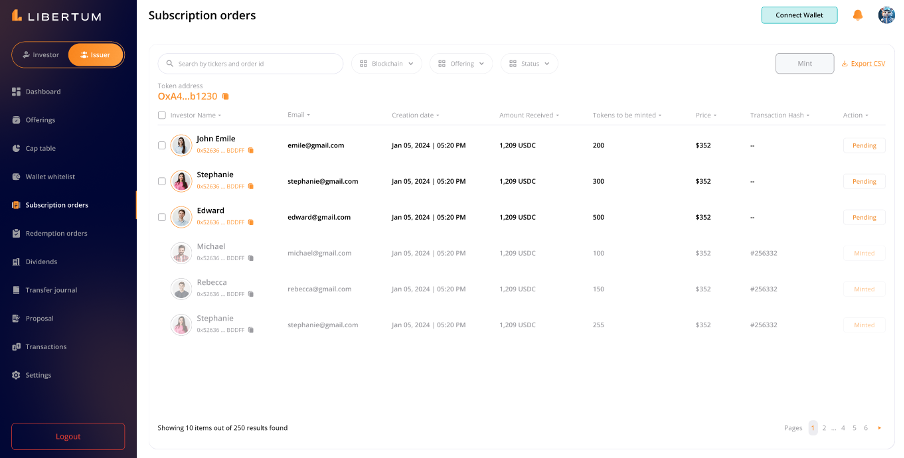
After a user confirms a payment via crypto or fiat, a request is automatically generated and displayed in the “Subscription Orders” tab with a status of “Pending.” The request will include the following fields:
● Investor Name
● Wallet Address
● Email ID
● Amount Received
● Tokens to be Minted
● Price per Token
● Fees
● Transaction Hash
● Action Status (Pending/Minted/Rejected)
FR:046 The issuer must click on the “Search Bar” to search for a particular offering by entering the ticker or order Id.
FR:047 The issuer must click on the “Blockchain” to search the requests received for subscription using the blockchain filter.
FR:048 The issuer must click on the “Offering” to search the requests received for subscription using the offering filter.
FR:049 The issuer must click on the “Status” to search the requests received for subscription using the Status filter.
FR:050 The issuer must click on the “Export CSV” to export the CSV file of the investor and transaction data.
FR:051 The issuer must click on the “Mint” button available on the top right to mint a particular token.
If tokens have already been minted for an investor, that investor’s details will be greyed out and unselectable.
FR:052 The issuer must click on the “Check box” to select a particular or multiple Investor simultaneously.
FR:053 The issuer must click on the “Mint” button available on the extreme right of a particular row to mint the token and send them to the particular whitelisted wallet address. This button will be enabled only if one or more investors are selected. If no investors are selected, the button will be disabled.
After the tokens are successfully minted. The payment from the escrow account will be transferred to the IM wallet. The applicable fees will be transferred to the designated fees account.
Redemption Orders
The “Redemption Orders” page enables the issuers to distribute expected payments to investors who have successfully made redemption request.
Redemption Request Handling: When an investor confirms a redemption request, the request is sent to the issuer for processing. This involves burning the tokens and transferring the corresponding amount to the investor’s whitelisted wallet address.
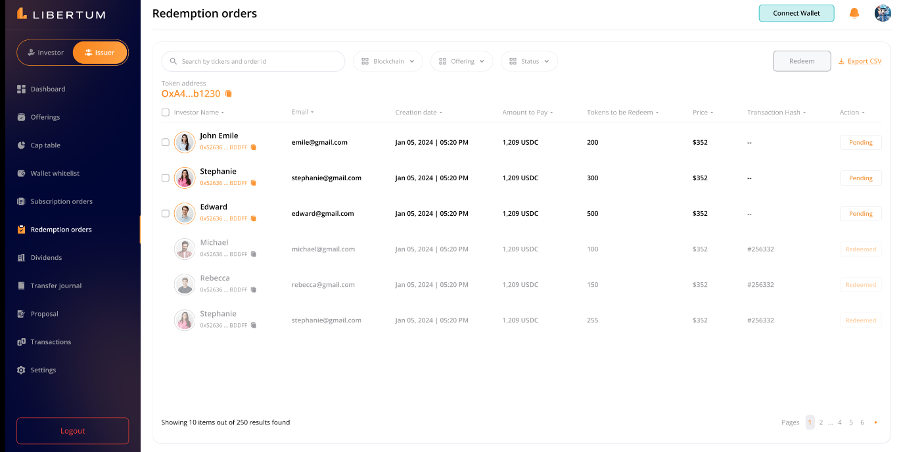
The redemption list will display the following fields for each investor:
● Investor Name
● Wallet Address
● Email ID
● Request Creation Date
● Amount to Pay
● Tokens to be Redeemed
● Transaction Hash
● Action Status:
\ ○ Pending
\ ○ Cancelled
\ ○ Redeemed
FR:054 The issuer must click on the “Search Bar” to search for investors by their email address or name to quickly locate specific redemption requests.
FR:055 The issuer must click on the “Blockchain” to search the blockchain network for burning tokens, with the default set to the base chain.
FR:056 The issuer must click on the “Offering” and only one offering can be selected at a time from a dropdown menu, with the latest offering being selected by default.
FR:057 The issuer must click on the “Status” to sort redemption requests by their status, helping issuers manage the list view effectively.
FR:058 The issuer must click on the “Redeem” button available on the top right to redeem a particular token.
If tokens have already been redeemed for an investor, that investor’s details will appear greyed out and will be unselectable.
FR:059 The issuer must click on the “Check Box” available on the extreme right of a particular row to redeem the token and burn them.
● This button will be enabled only if one or more investors are selected. If no investors are selected, the button will be disable
● Upon initiating the burn, the selected tokens will be burned from the investors’ whitelisted wallet addresses.
● The corresponding payment will be transferred from the issuer’s wallet to the investor’s whitelisted wallet address.
FR:060 The issuer must click on the “Export CSV” to export the CSV file of the investor and transaction data, including details from the redemption list, in CSV format for offline record-keeping or further analysis.
Dividends
The “Dividends” section lets investors ensure secure and accurate transfers of dividends to investors’ wallets.
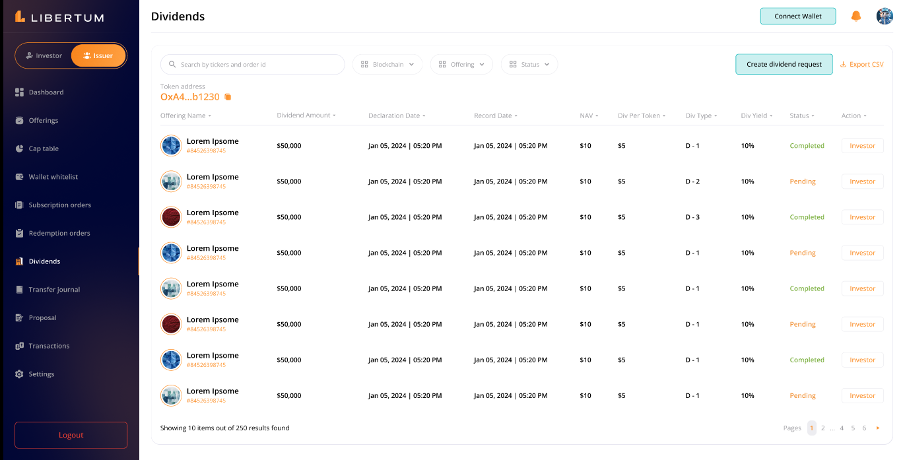
The created dividend requests will be displayed in a table with the following details:
● Offering Name & Ticker
● Dividend Amount Distributed
● Declaration Date
● Record Date
● Net Asset Value (NAV)
● Dividend per Token
● Dividend Type
● Dividend Yield
● Status: Pending or Completed
● Action: Investor button
FR:061 The issuer must click on the “Search Bar” to search for investors by email ID or name.
FR:062 The issuer must click on the “Blockchain” so that the table can be filtered based on the status of the blockchains.
FR:063 The issuer must click on the “Offerings” so that the table can be filtered based on the status of the offerings.
FR:064 The issuer must click on the “Filter Option” so that the table can be filtered based on the status of the dividend distribution (All, Pending or Completed).
FR:065 The issuer must click on the “Create Dividend Request” available on the top right to create a dividend request. Upon clicking “Create Dividend Request,” a modal will appear where the Issuer must input the following details:
● Offering Name: Select the offering from a dropdown menu for which the dividend is to be distributed.
● Dividend Amount: Enter the total amount of dividends to be distributed.
● Record Date: Specify the date when the dividend will be distributed to eligible investors.
● Upload Document: Option to upload a document, such as a dividend report, related to the distribution.
● After entering the required details, the “Confirm” button will become active.
Once confirmed, the dividend request will be created and listed on the dividend management page.
FR:066 The issuer must click on the “Export CSV” to export the CSV file of the investor list, in CSV format for offline record-keeping or further analysis.
FR:067 The issuer must click on the “Investor” button available under the Action column to be redirected to the investor details page, which includes:
● Total Dividend Amount
● Total Tokens Distributed
● Token Address
● Investor Name & Wallet Address
● Email ID
● Dividend Amount
● Tokens Held by the Investor
● Status:
\ ○ Pending
\ ○ Success
● The “Investor” button will become active on the record date.
FR:068 The issuer must click on the “Check box” available on the extreme right of a particular row to distribute the dividends on the record date. On the record date, a “Distribute” button will be activated.
● The Issuer can select one or multiple investors by ticking the checkboxes.
FR:069 The issuer must click on the “Distribute” button, the funds will be transferred from the Issuer’s wallet to the selected investors’ wallet addresses.
Note:
● Before initiating the distribution, the Issuer’s wallet balance will be checked.
● If the balance is insufficient, an error message will be displayed: “Insufficient balance in the wallet address.”
Transfer Journal
The “Dividends” section lets investors ensure secure and accurate transfers between investors’ wallets.
When an Issuer receives a transfer request from an investor to move tokens from one whitelisted wallet address to another, the request will appear in the “Transfer Journal” section of the Issuer persona.
The transfer request will originate from the investor’s persona and will be visible to the Issuer with all necessary details.
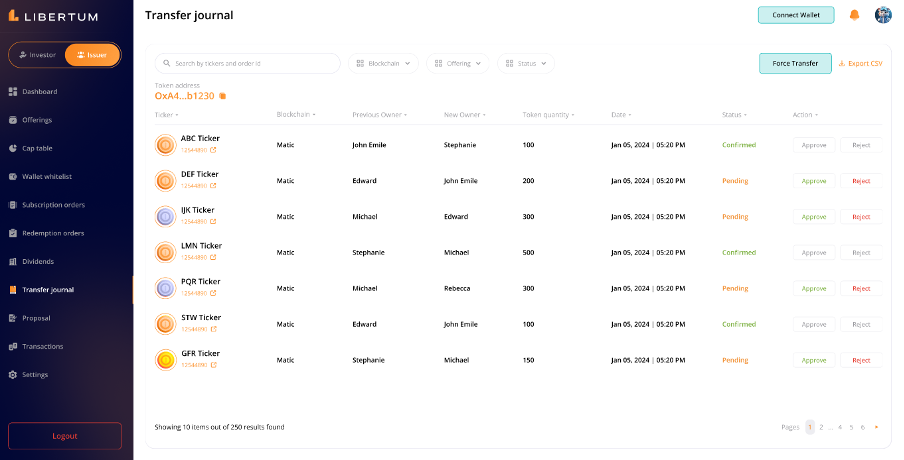
The Transfer Journal listing table will include the following details for each transfer request:
● Offering Name & Ticker
● Blockchain
● Previous Owner
● New Owner
● Token Quantity
● Date of Request
● Status:
\ ○ Confirmed
\ ○ Pending
\ ○ Rejected
● Action
\ ○ Approve
\ ○ Reject
FR:070 The issuer must click on the “Search Bar” to search for specific transfer requests based on Offering Name & Ticker.
FR:071 The issuer must click on the “Blockchain” so that the table can be filtered based on the status of the blockchains.
FR:072 The issuer must click on the “Offerings” so that the table can be filtered based on the status of the offerings.
FR:073 The issuer must click on the “Filter Option” so that the table can be filtered based on the status of the transfer request (All, Confirmed, Pending or Rejected)
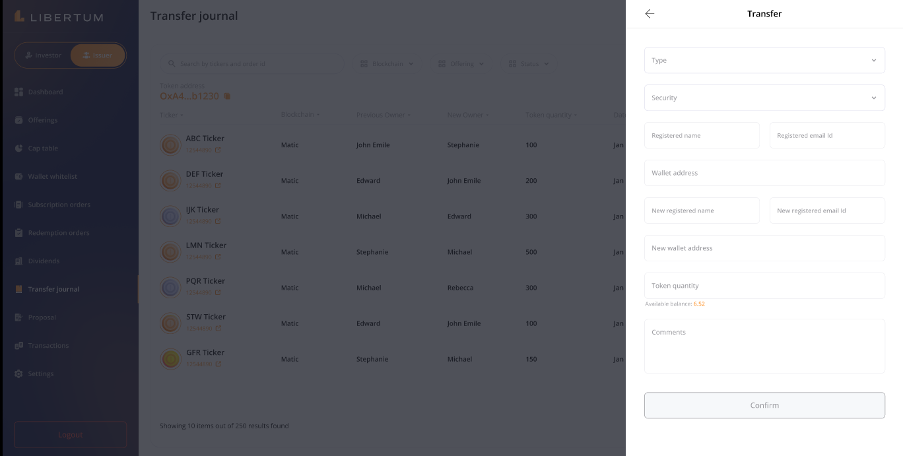
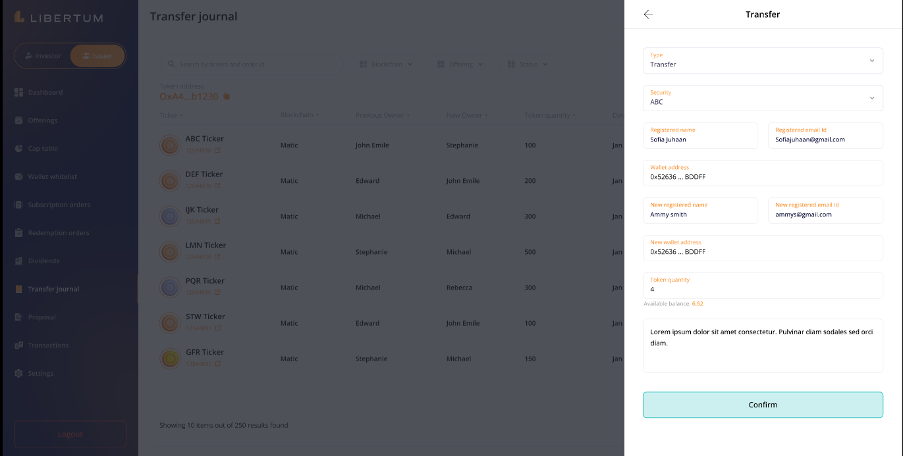
FR:074 The issuer must click on the “Force Transfer” available on the top right to transfer the tokens from one wallet address to another wallet address. The issuer will be redirected to another pop-up page where they must input the following details:
● Type: Select the token to be transferred to another whitelisted wallet.
● Security: Select the security (token) being transferred from the drop down menu.
● Registered Name: Autofilled with the name of the account holder sending the tokens.
● Registered Email ID: Autofilled with the email ID associated with the sender’s account.
● Sender Wallet Address: Autofilled with the wallet address from which the tokens will be transferred.
● New Registered Name: Enter the recipient’s name if not already registered.
● New Registered Email ID: Enter the recipient’s email ID if not already registered.
● New Wallet Address: Input the wallet address where the tokens will be transferred.
● Token Quantity: Input the number of tokens to be transferred. The available balance will be displayed below this field to indicate the maximum transferable amount.
● Comments: An optional field where the Issuer can include notes or instructions related to the transfer.
● After entering the required details, the “Confirm” button will become active.
Once confirmed, the tokens will be transferred from one wallet to another wallet.
FR:075 The issuer must click on the “Export CSV” to export the CSV file of the transfer request list, in CSV format for offline record-keeping or further analysis.
FR:076 The issuer must click on the “Approve” button under the Action column to approve the transfer request received.
● The Issuer can review the transfer request in the Transfer Journal and choose to approve or reject it.
● Upon clicking “Approve,” the token transfer will be initiated, moving the specified tokens from the previous wallet to the new whitelisted wallet.
FR:077 The issuer must click on the “Reject” button under the Action column to approve the transfer request received. If the Issuer rejects a transfer request, they must provide a reason for the rejection. An email will be sent to the investor with the reason for the transfer request rejection.
Proposal
The Proposal section enables the issuer to create a proposal so that investors can participate in the voting process.

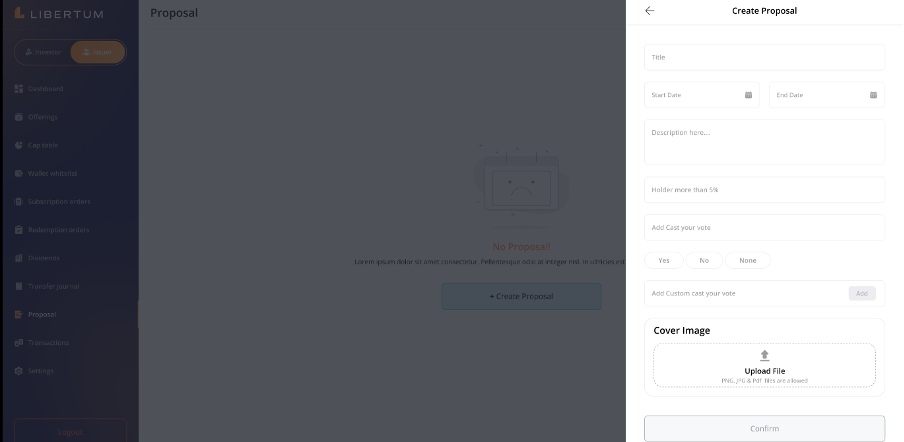
FR:078 The issuer must create on the “+ Create Proposal” to be redirected to the Create Proposal page where the issuer must input the following details on the form-
● Proposal Title
● Start Date & Time
● End Date & Time
● Description
● Holding Percentage (Applicable for Voting)
● Add Cast your vote
\ ○ Yes
\ ○ No
\ ○ None
● Add Custom caste your vote
● Proposal Cover Image
● After entering the required details, the “Confirm” button will become active.
Upon confirmation, the proposal will be listed on the Proposal Listing page for both the Issuer and eligible Investors.
The proposal will only be visible to investors holding tokens for the associated offering. Non-investors will not be able to view the proposal.
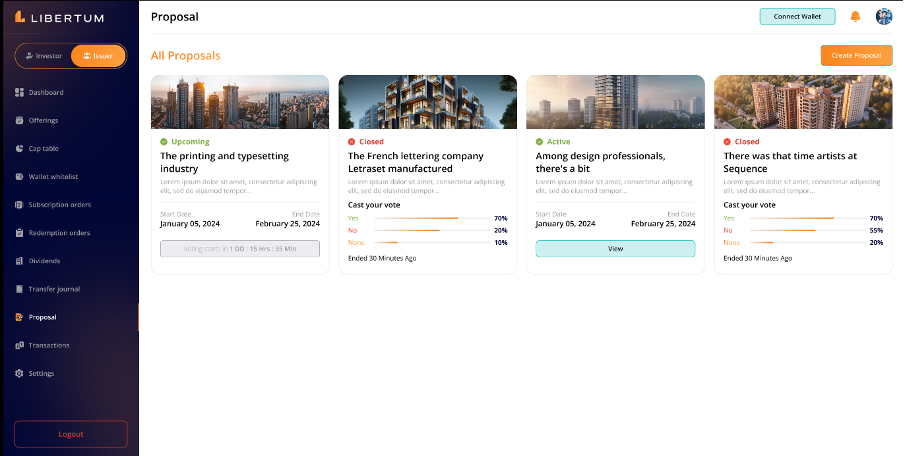
The proposal will have a status of “Active,” “Upcoming,” or “Closed” based on the Start Date.
● Upcoming: Displays a countdown timer (e.g., “Voting starts in 1 day, 12 hrs, 35 mins”).
● Active: Investors can vote with 1 token equating to 1 vote.
● Closed: Voting results are displayed, showing the percentage of votes for Yes, No, or None, along with Voter addresses, Voting types, and Voting power percentages.
FR:079 The issuer must click on the “Proposal tile” to cast their vote. Investors can vote with 1 token equating to 1 vote.
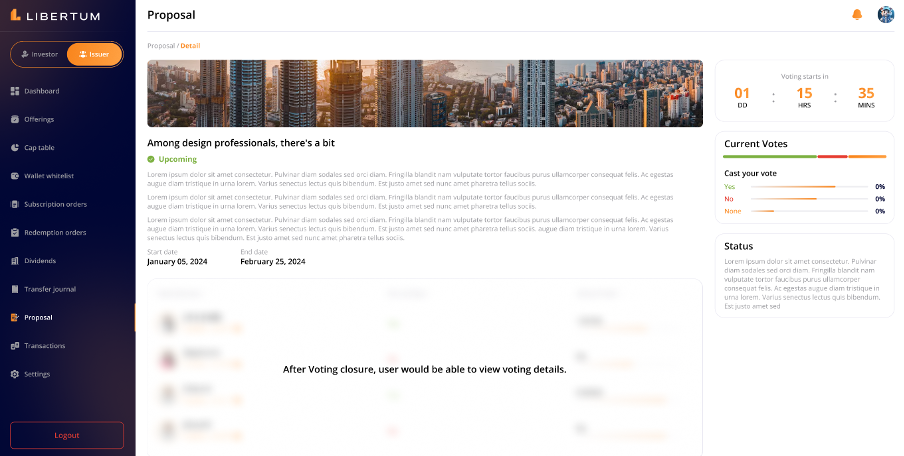
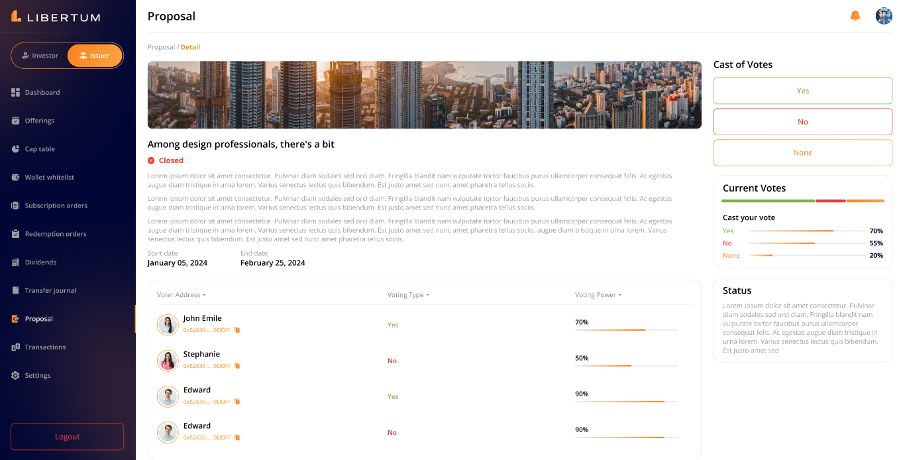
FR:080 The issuer must click on the “View” button to view the detailed proposal information. The detailed view will include the Proposal Cover Image and Description.
● For “Upcoming” proposals, a countdown timer will be displayed.
● For “Active” proposals, voting options (Yes, No) will be available.
● For “Closed” proposals, voting results, including percentages and voter details, will be visible.
Transactions
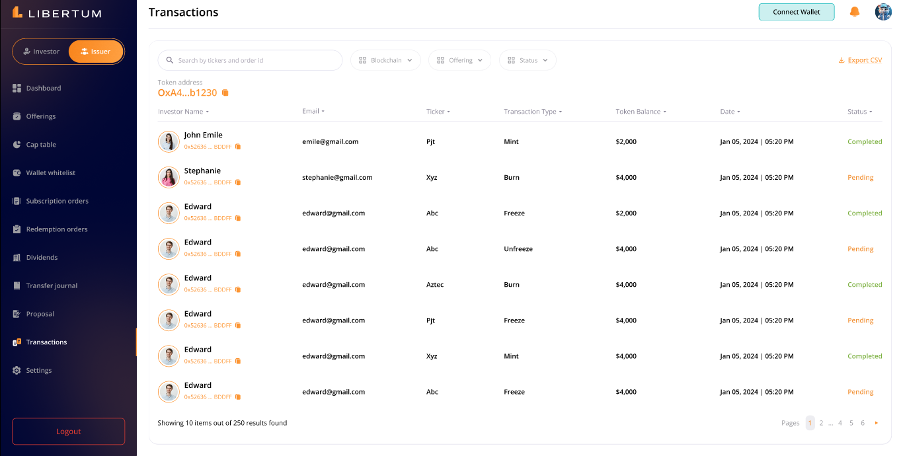
FR:081 The issuer must click on the “Search Bar” to search for specific transaction requests based on Ticker & Order Id.
FR:082 The issuer must click on the “Blockchain” so that the table can be filtered based on the status of the blockchains.
FR:083 The issuer must click on the “Offerings” so that the table can be filtered based on the status of the offerings.
FR:084 The issuer must click on the “Filter Option” so that the table can be filtered based on the status of the transaction (All, Pending or Completed)
FR:085 The issuer must click on the “Export CSV” to export the CSV file of the transaction list, in CSV format for offline record-keeping or further analysis.
Settings
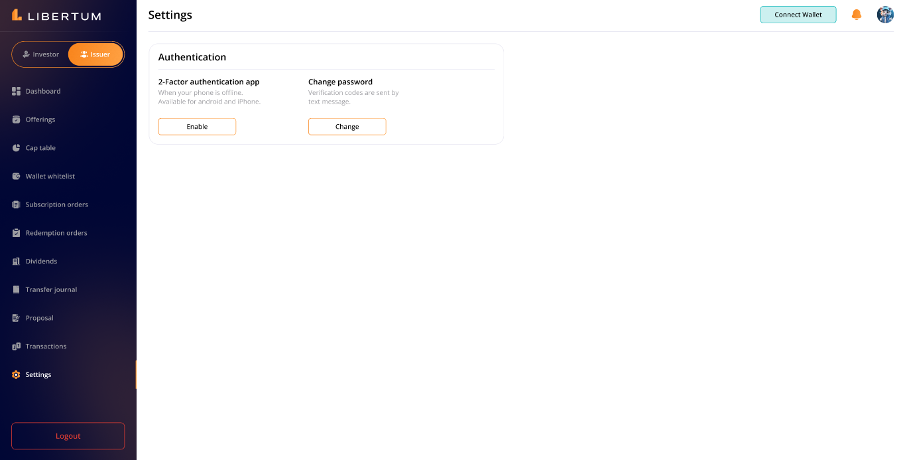
FR:086 The issuer must click on the “Enable” under the 2 Factor Authentication app to enable or disable the 2FA through the google authenticator application.
FR:087 The issuer must click on the “Change” under the Change Password to change the password.